Contributing DevOps to Open Source
- Brett Petrusek
- Open source , Devops
- September 20, 2023
Intro
Not getting callbacks on DevOps job applications? Employers saying you don’t have enough experience?
You have the power to fix these problems. All it requires is some effort.
Open source experience is requested on over 63% of DevOps job postings. This is because contributing to open source projects is the best way to showcase your abilities and gain valuable, real world experience. Employers know this.
I’m going to show you how to:
- find open source projects that need DevOps help
- qualify opportunities for contribution to those projects
- understand the rules of contribution
- submit your PR and get it approved
Let’s see those potential employers try to say you don’t have experience then.
Getting Started
For this exercise to be successful, you will need:
- a little bit of NodeJS experience
- a GitHub account and a personal API token
- grit and determination
I’m going to walk you through the process of finding potential GitHub issues. It is up to you to evaluate each one to see if you have the skills to contribute. I will explain my thought process and troubleshooting steps as I go along. This is not for the faint of heart.
Finding GitHub Issues
GitHub has a rich search feature built into the web UI. Sure, you can use that. But we are DevOps engineers. We have to write a script. This is quick and dirty. I just wanted to find repos with the “open source” label that have open issues with the “devops” keyword in them.
import { Octokit, App } from "octokit";
import 'dotenv/config';

// Create a personal access token at https://github.com/settings/tokens/new?scopes=repo
const octokit = new Octokit({ auth: process.env.GITHUB_TOKEN });

// Get a list of repositories with the "opensource" topic that have >100 stars
const repositoryIterator = octokit.paginate.iterator('GET /search/repositories', {
  q: "topic:opensource stars:>100",
  per_page: 100
});

// Iterate through the list of repos and search their issues for our keyword
for await (const { data: repos } of repositoryIterator) {
  for (const repo of repos ) {
    const issuesIterator = octokit.paginate.iterator('GET /search/issues', {
      q: `devops in:title,body,comments state:open repo:${repo.owner.login}/${repo.name}`,
      per_page: 100,
    });

    for await (const { data: issues } of issuesIterator) {
      for (const issue of issues) {
        console.log("Repo: %s/%s - Title: %s - URL: %s", repo.owner.login, repo.name, issue.title, issue.html_url);
      }
    }
  }
}
You will need a personal access token for your GitHub account. Drop that into a .env file in the same directory as this script. The var name is GITHUB_TOKEN. Like so:
GITHUB_TOKEN="ABCDEFG"
Run the script and wait. You may see some output regarding API throttling, but you can ignore that for now. Eventually, it will start generating output that looks like this:
Repo: nextcloud/server - Title: Users should be able to choose whether reminders are generated for events in the birthday calendar - URL: https://github.com/nextcloud/server/issues/1505
Repo: provectus/kafka-ui - Title: [e2e] Slack integration for failed test runs - URL: https://github.com/provectus/kafka-ui/issues/3365
Repo: h2oai/h2o-3 - Title: Write Jest tests for PaymentMethod rejected and Preorder button - URL: https://github.com/h2oai/h2o-3/issues/8941
Repo: h2oai/h2o-3 - Title: Email alert when spill to disk is occurring - URL: https://github.com/h2oai/h2o-3/issues/13017
Repo: h2oai/h2o-3 - Title: Setup GCP to perform H2O-3 experiments - URL: https://github.com/h2oai/h2o-3/issues/15678
Repo: h2oai/h2o-3 - Title: Create CODEOWNERS - URL: https://github.com/h2oai/h2o-3/pull/15571
As you can see from the script, this output contains the repo name, the title of the issue, and a link to the issue. Now we have to determine which issues are actual DevOps issues and are opportunities for us to contribute.
Qualifying an Opportunity
Since we are only doing basic filtering, there is no guarantee that the issues we found are actual opportunities to contribute. To qualify an issue, we have to open it up, read it, and evaluate it.
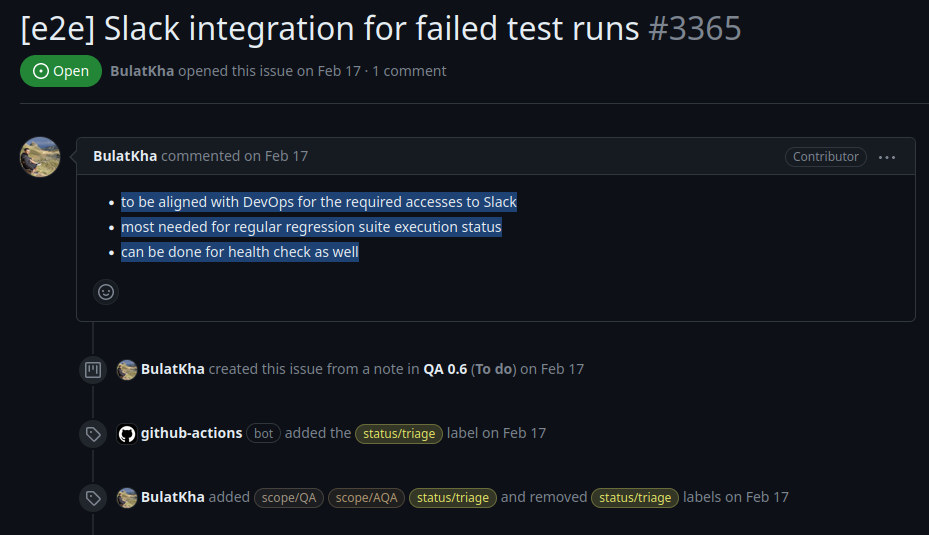
Given that I recognize the kafka-ui project because I have used it extensively, I’m going to choose the issue I found in that repo above. Opening it up, I see the following description:

Ok. Simple enough. They want Slack notifications on failed test runs.
Any open source project that will accept a PR will have a CONTRIBUTING.md in the root of the repo. Step one is to read this file and fully understand it.
Next, we have to figure out how the tests execute. I go to the code repo and look in the root to see if I recognize any build system config files. Is there a Jenkinsfile? Nope. Is there a CircleCI config? Nope. Is there a .github/workflows directory? Indeed there is.
I now know that this repo uses GitHub actions/workflows for builds and tests. I also know that there is a simple GitHub workflow integration with Slack, but it has a few different methods of implementation, depending on how Slack is set up.
This is enough to go on for now. I feel confident that this falls into the “DevOps” realm of issues and that I can contribute a codified solution that will resolve the issue.
Time to get to the fun part.
Making A Contribution
Depending on the level of complexity of your contribution, some of the guidance in CONTRIBUTING.md may be applicable, and some of it may not. If there is any doubt, contact the repo owner.
Our issue is already assigned to someone, but it’s been sitting for over six months. It also doesn’t have the labels that the CONTRIBUTING.md file says it should have if I am going to contribute a fix. I’m going to push ahead anyway and see what happens.
I fork the repo and clone it locally.
I head out to the github.com Marketplace and search for actions that have “Slack” in the name. The first one that comes up is the official SlackAPI action. I pull up the docs and start reading.
Since, I don’t know which method the kafka-ui project prefers to use (Slack Workflow Builder, Slack App, or Slack Webhook), I have to conditionally implement all three. This gives the kafka-ui project owners the ability to choose which method they prefer.
I added the following file under .github/workflows
- name: Send GitHub Action trigger data to Slack workflow
  id: slack-workflow
  if: secrets.SLACK_WORKFLOW_WEBHOOK_URL
  uses: slackapi/[email protected]
  with:
    status: ${{ job.status }}
    notify_when: 'failure'
  env:
    SLACK_WEBHOOK_URL: ${{ secrets.SLACK_WORKFLOW_WEBHOOK_URL }}

- name: Post to a Slack channel
  id: slack-channel
  if: secrets.SLACK_BOT_TOKEN
  uses: slackapi/[email protected]
  with:
    status: ${{ job.status }}
    notify_when: 'failure'
    channel-id: ${{ SLACK_CHANNEL_ID_LIST }}
    slack-message: "GitHub build result: ${{ job.status }}\n${{ github.event.pull_request.html_url || github.event.head_commit.url }}"
  env:
    SLACK_BOT_TOKEN: ${{ secrets.SLACK_BOT_TOKEN }}

- name: Send custom JSON data to Slack workflow
  id: slack-webhook
  if: secrets.SLACK_WEBHOOK_URL
  uses: slackapi/[email protected]
  with:
    status: ${{ job.status }}
    notify_when: 'failure'
    payload: |
      {
        "text": "GitHub Action build result: ${{ job.status }}\n${{ github.event.pull_request.html_url || github.event.head_commit.url }}",
        "blocks": [
          {
            "type": "section",
            "text": {
              "type": "mrkdwn",
              "text": "GitHub Action build result: ${{ job.status }}\n${{ github.event.pull_request.html_url || github.event.head_commit.url }}"
            }
          }
        ]
      }
  env:
    SLACK_WEBHOOK_URL: ${{ secrets.SLACK_WEBHOOK_URL }}
    SLACK_WEBHOOK_TYPE: INCOMING_WEBHOOK
* Please note that this solution may not be 100% functional. The purpose of this article is to demonstrate the process of contributing to an open source project. Not implementing a Slack notification solution for GitHub actions.
I commit my change and add the commit comment using the format described in the CONTRIBUTING.md. Then I push my changes to my fork of the repo.
I am now ready to begin the Pull Request journey, which is hardly the last step in the process.
Getting Your PR Approved
We followed all the instructions in CONTRIBUTING.md. We created a robust, customizable solution. Our PR should just get magically approved, right?
Wrong.
I have yet to see an outside contributor submit a PR that is approved without any changes or feedback. Be prepared to go back and forth with the repo owners on how to tweak your submission to fulfill all their requirements.
Besides the self motivated research and initiative, the open source PR process is probably the most valuable experience you will gain from this exercise. This is how it works inside a company. No one ever perfectly agrees on the way to do something.
Don’t lose hope. Stand your ground. Be polite. And for God’s sake, listen! Listen to what they are asking you to do. Listen to their advice. Listen to their critique and feedback. You will learn so much. Be sure to thank them at every step of the way.
I will tell you now that it is possible they reject your PR entirely. If this happens, take the feedback and use it as a basis for new requirements. Submit another PR and try again.
I will also tell you that there is no sweeter feeling than when they do approve your PR. You will see your code in the master branch and you will smile inwardly. This is what keeps me going every day.
Conclusion
Document your open source contribution story as it unfolds. I have personally hired multiple candidates that walked me through open source contribution horror stories in excruciating detail. The worse the experience, the better the story.
But this is how we learn. Tutorials, while technically accurate, completely miss the human component of software development and DevOps.
Sometimes requirements are not clearly articulated. Sometimes a user story is interpreted differently than what the author intended.
In the real world, things get lost in translation. Learning how to deal with those situations while still delivering value is what makes a good DevOps engineer.
Shameless Plug
My Experience Builder service takes care of finding DevOps GitHub issues and qualifying DevOps GitHub issues. It also filters on technology type to make it easy to find opportunities that match your skill set.


